LAB
EXERCISE 22: Employee Data 2
Goal:
In this exercise, you will learn how to:
1.
Insert the Main Method (Main Entry Point to the Java Program)
2. Import the Library Classes which allow data
to be read from an external text file
a. import java.io.File
b. import java.io.FileReader
c. import java.io.BufferedReader
d. import java.io.FileNotFoundException
e. import java.io.IOException
3. Declare Variables
4. Create a Void Method
5. Use a Try-Catch block statement for error
file handling and exceptions
6. Create the Object from the Class
7 Call the Object’s Method
Pre-requisite: You must complete Lab Exercise 20 – Employee Data 1.
Program Specifications:
This
program reads the data from an external file (employee.txt file) and then
display the read data results on the console.
A.
Pre-requisites:
1. Create a folder on your desktop Exercise-22
2. Launch Java EE- Eclipse
Note: You will need to use the Java
Perspective Workbench for this exercise
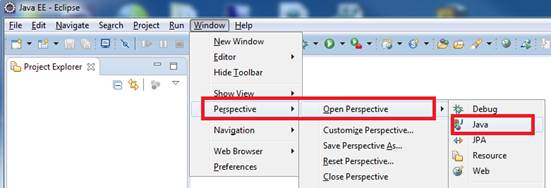
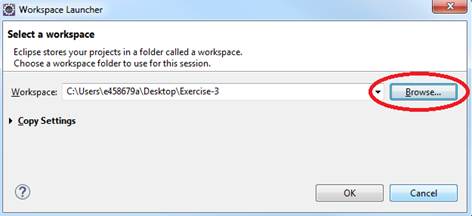
3. Setup your Eclipse Workspace to point to the Exercise-22
folder
a. Select File-> Switch Workspace
b. Browse and select your Exercie-22 folder as your Workspace.
B. Requirements:
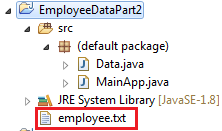
1. Create
a Java Project and name it as EmployeeDataPart2
2. Create
the first Class that will have the Main Method
a.
Name the
Class as MainApp
b.
Choose
the main method to insert into the class
3. Create
a class called Data.
4. Copy
the employee.txt
file from the Exercise21 folder into the Exercise22/ EmployeeDataPart 2 subfolder
NOTE: The employee.txt should be copied inside the
EmployeeDataPart2 project folder.
C. Requirements
for the Data Class:
1. Insert
the following Library Classes which will read the data from an external text
file:
import java.io.File
import java.io.FileReader
import java.io.BufferedReader
import java.io.FileNotFoundException
import java.io.IOException
2. Create
a Void Method - readData() that will execute the code to read the data from an
external file – employee.txt
a. Create instance of the object filename from the File library class & pass the
file name “employee.txt” as a parameter
|
File
filename = new File("employee.txt"); |
b. Use Try-Catch
block to perform error handling if can not write to
the external file
b1.
Create instance of the object "fr" from the FileReader class & pass the value of the
"filename" as a parameter
|
FileReader fr
= new FileReader(filename); |
b2. Create instance of object
"br" from
the BufferredReader
library class & pass the value of the "fr" object as the parameter
|
BufferedReader br
= new BufferedReader(fr); |
b3. Store the read data into the
String variables
|
String
fName = br.readLine(); |
b4. Display the read data results on the
console
|
System.out.println("First Name:
" + fName ); |
b5. Close the employee.txt file
|
br.close(); |
c. In the 1st Catch-block,
add the parameter (FileNotFoundException e)
Insert the code below to display
theerror handling message
|
System.out.println("File not
found: " + filename.toString()); |
d. In the 2nd Catch-block, add the parameter (IOException
e)
Insert the code below to display
the error handling message
|
System.out.println("Unable to read
file: " + filename.toString()); |
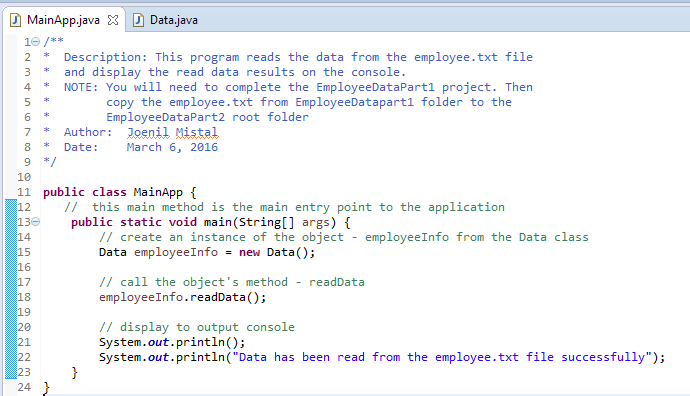
D. Requirements for the MainApp Class:
1. Add comments
(documentation)– Program Description, Author and Date
2. Create
an instance of the object - employeeInfo from the
Data class:
Data employeeInfo = new
Data()
3. Call the object's method- writeData:
employeeInfo.readData()
4. Display the output message to the console
|
//
display to output console |
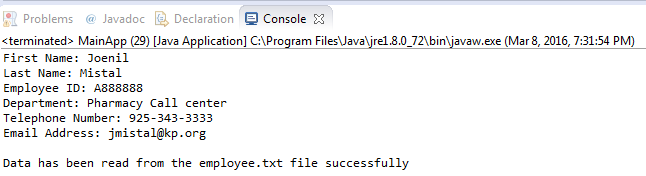
E, Test:
1. Save your Java code
2. Compile and run your Java program.
3. Verify there is no syntax, logical or run-time
errors.
4. When your run the Java program, the data will
be read from the external file – employee.txt
Example:
F. Submit your exercise in the Canvas Lab
Exercise #22 Drop Box.
1. Submit the screen shot of the Eclipse
Workbench window showing the Console output screen.
You can use Paint (save as JPG) or Word to paste the screenshot.
2.
Submit the employee.txt data file.
3. Zip up and submit the compressed EmployeeDataPart2 subfolder that is in the Exercise-22
folder.
NOTE: Right click on the subfolder and select
Send to “Compress Folder”. The file will
have a file extension of .zip.
NOTE: You will need to upload the 3 files above separately.