LAB
PROJECT 03: JDBC Demo 3
Goal:
In this project exercise, you will learn how to:
1.
Install the MySQL
Database software
2. Run the SQL
scripts to create the database, table
and records
3. Download the MySQL
JDBC Driver (Java Database Connector)
4. Add MySQL database driver to the Java Project Class Path
5. Import the Java
SQL Library Classes
6. Create a Void
Method
7. Create the variables
for the SQL connection and SQL query
8. Create the SQL
objects
from the SQL Library Classes and initialize
9. Use a Try-Catch
block statement for the database read error handling and exceptions
10. Setup the SQL
database connection
11. Call the object’s
Create Statement
method
12. Create the object from the Result Set SQL Library Class
13. Execute the
SQL query by calling the method and
passing the query value
14. Close the database connection
15. Create an instance of object from the Class
16. Call the object’s Void method
Program
Specifications:
Description: This Java application updates the student
data in the MySQL database
The program will first prompt the user to enter the student ID, first and last
name. The program will program the user the update the student’s total lab
exercises points, total project points and final exam points. The program will
then re-calculate the student total points earned and the student's letter
grade.
The updated data will then be written to the MySQL
Database. This Java application will
update the record in the table of the MySQL database.
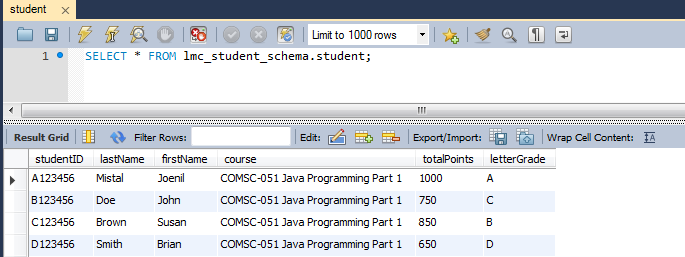
Below is the SQL database schema structure:
Database Name: lmc_student_schema
Table Name: student
Fields Name and DataType:
1. studentID VARCHAR(10) NOT NULL
PRIMARY KEY studentID
2. lastName
VARCHAR(45) NOT NULL
3. firstName
VARCHAR(45) NOT NULL
4. course VARCHAR(45) NOT NULL
5. totalPoints INT(11) NULL
6. letterGrade VARCHAR(1) NULL
A. Software Installation Pre-requisites:
1. You will need to have the
MySQL database server installed on your PC.
Below is the link to download
and install the software
http://dev.mysql.com/downloads/mysql/
NOTE: The LMC Computer Lab
has the MySQL Database server software installed on all the PCs.
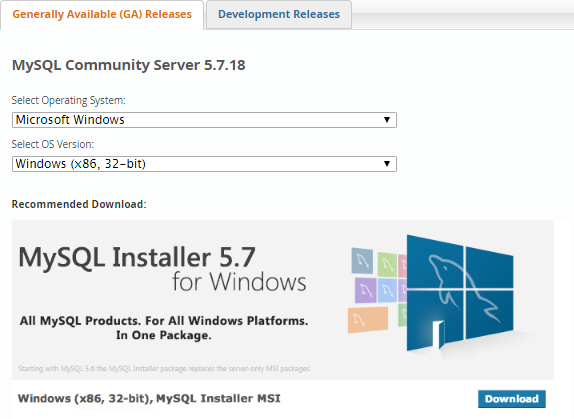
NOTE: You will need to install all components
(MySQL Server, MySQL Workbench, MySQL Notifier)
2. a. Create a
folder on your desktop called JDBC-Driver
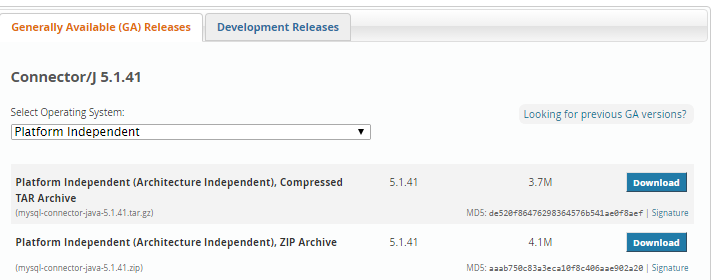
b. Download the MySQL JDBC Driver
to your JDBC-Driver folder. Below is the
link to download the driver
http://dev.mysql.com/downloads/connector/j/
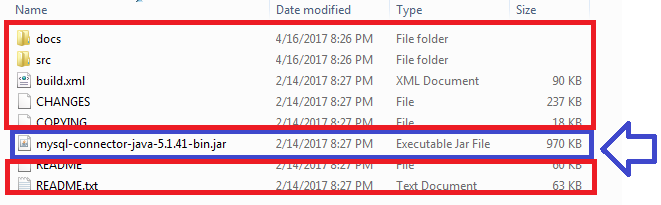
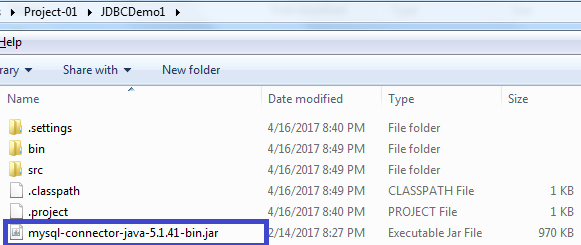
c. Verify in
your JDBC-Driver folder, you have the mysql-connector-java-5.1.41-bin.jar
file
NOTE: You will only need the mysql-connector-java-5.1.41-bin.jar.
You will NOT need the
other folders and files (circled in red)
B. SQL
Database Schema Setup Pre-requisites:
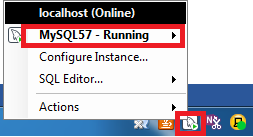
1. Verify the MySQL57 Service is running on your
PC.
Right click on the MySQL Notifier icon in the System
Tray
2. Launch the MySQL
Workbench from the Start Programs Menu
![]()
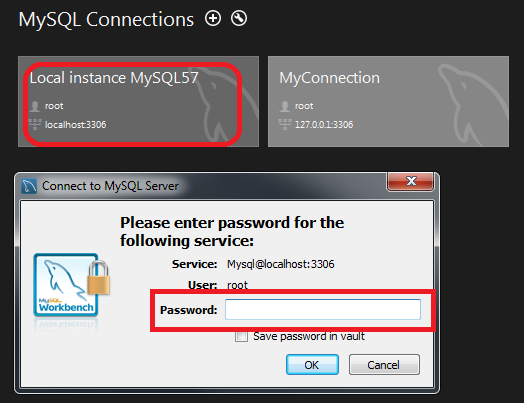
3. Click on the Local instance MySQL57.
Enter the Password that you have
entered during the installation setup
NOTE: At the LMC Computer Lab PCs, the password is comsc051
4. Create the lmc_student_schema database
by running the SQL script
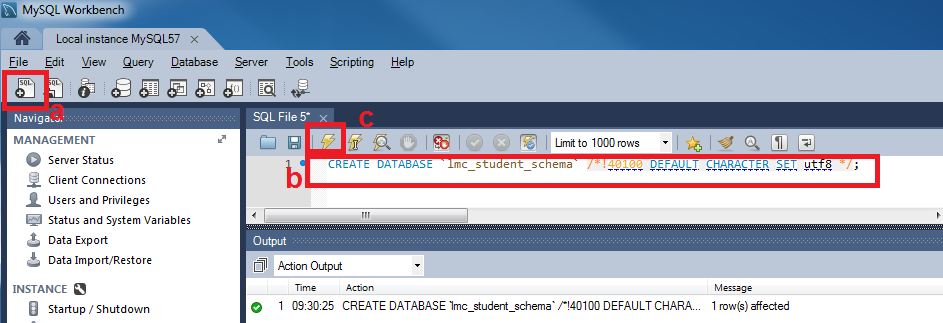
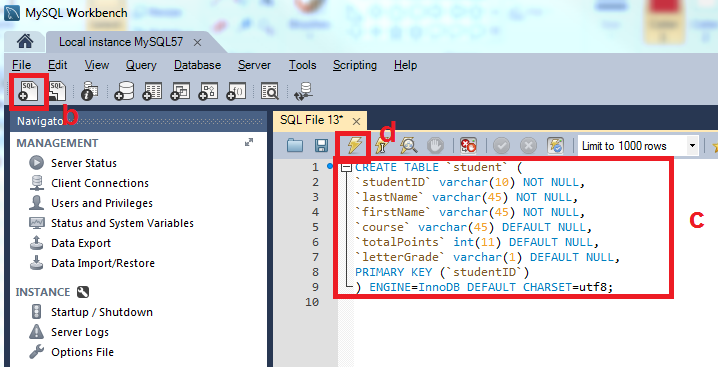
a. Click on the new SQL tab for
executing scripts/ queries
b. Copy and paste the SQL script
below to the query window
|
CREATE DATABASE `lmc_student_schema`
/*!40100 DEFAULT CHARACTER SET utf8 */; |
c. Click on the execute button to run the
script
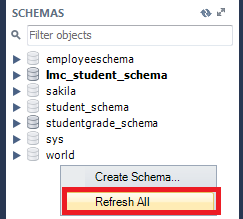
d. Right click on the Schemas window and
select Refresh All.
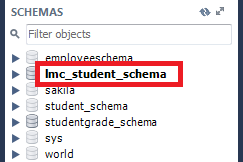
Note: You should see the newly
created database called lmc_student_schema
C. SQL
Table Setup Pre-requisites:
1.
Create the student
table in the lmc_student_schema database by running the SQL
script
a. Double click on the lmc_student_schema database.
Note: The database label should
turn bold
b. Click on the new SQL tab button
for executing scripts/ queries
c. Copy and paste the SQL script below to the query window
|
CREATE TABLE `student` ( |
d. Click on the execute button to run the script
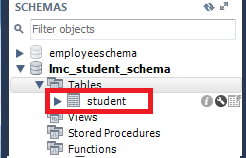
e. Under the lmc_student_schema, right click on the Tables label and
select Refresh All.
Note: You should see the newly
created table called student

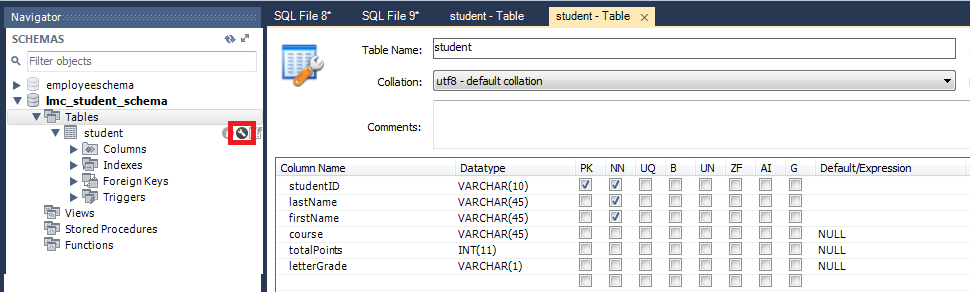
f. Verify the
table structure. Select the student
table and click on the Maintenance icon button.
D.
Insert Records Setup Pre-requisites:
1.
Create the records
for the student table by running the SQL script
a.
Expand the Tables folder and select the student table
b. Click on the new SQL tab button
for executing scripts/ queries
c. Copy and paste the SQL script below to the query window
|
insert into student (studentID, lastName, firstName, course, totalPoints, letterGrade)
values ('A123456','Mistal','Joenil','COMSC-051 Java Programming Part 1','1000','A'); |
d. Click on the execute button to run the script

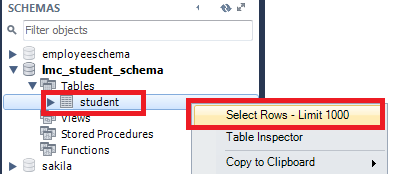
e. Verify if the
records were inserted into the table.
Right click on the student table
and click on the Select Rows.
E. Java Project Setup Pre-requisites:
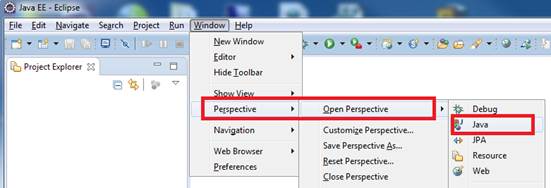
1. Launch Java EE- Eclipse
Note: You will need to use the Java
Perspective Workbench for this exercise
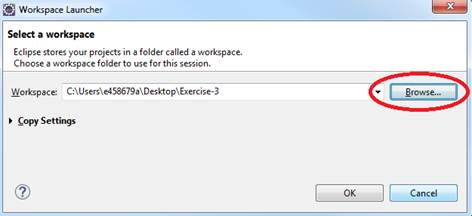
2. Setup your Eclipse Workspace to point to the Project-03
folder which you already created in Step A2 above
a. Select File-> Switch Workspace
b. Browse and select your Project-03 folder
as your Workspace.
F. Requirements:
1. Create a Java Project and name it as JDBCDemo3
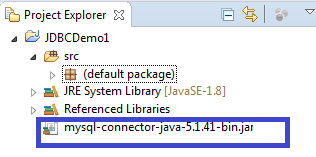
2. Copy and drag only mysql-connector-java-5.1.41-bin.jar file
into the JDBCDemo3
Project folder
![]()
3. IMPORTANT: Verify
the mysql-connector-java-5.1.41-bin.jar file is
inside the JDBCDemo3
folder
4. Press F5 to
refresh the View. You should see mysql-connector-java-5.1.41-bin.jar
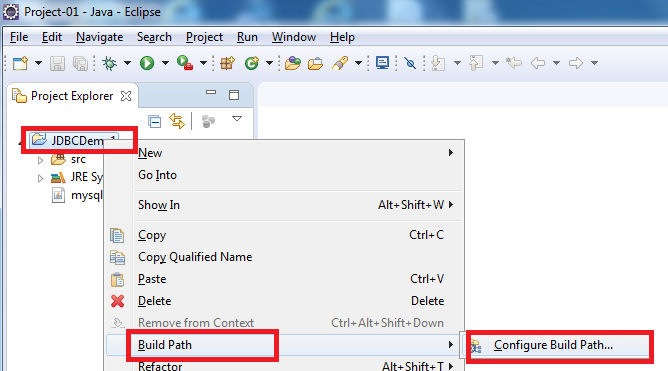
5. Add the MySQL database driver to the Java
Project Class Path
a. Right click on the JDBCDemo
project folder
b. Select Built Path and
then Configure
Build Path
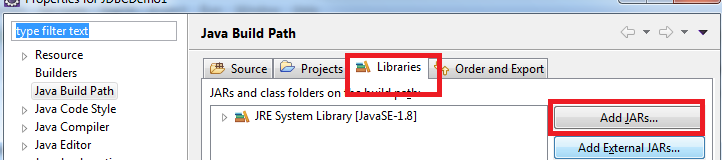
c. Select the Libraries tab and click on Add JARs button
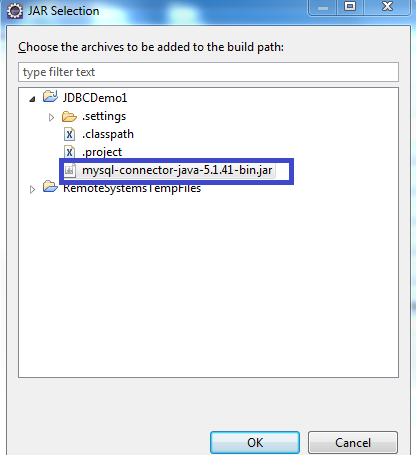
d. Select the mysql-connector-java-5.1.41-bin.jar
file and click OK
e. Verify the mysql-connector-java-5.1.41-bin.jar
in the Libraries path. Click the OK button.

6. Create
the first Class that will have the Main Method
a.
Name the Class as MainApp
b.
Choose the main method to insert into the class
7. Create
a class called Student.
This will be the superclass (parent)
8. Create
a class called Grade. This
subclass that will inherit the methods and variables of the Student superclass
9. Create
a class called Data. This subclass
that will inherit the methods and variables of the Grade superclass
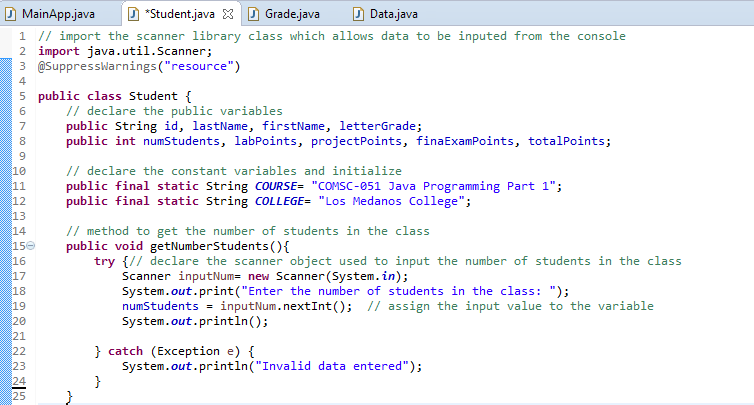
G. Requirements for the
Student Class:
1. Insert
the import java.util.Scanner class
which will allow data to be inputted from the console.
Insert the line @SuppressWarnings("resource")
2. Create
the public variables
|
public
String id, lastName, firstName,
letterGrade; |
3. Create
the public constant static variables and initialize
|
public
final static String COURSE= "COMSC-051 Java Programming Part 1"; |
4. Create
the public Void Method called getNumberStudents() that will prompt the user for the number of students in
the class.
|
try
{// declare the scanner object used to input the number of students in the
class } catch (Exception e) { } |
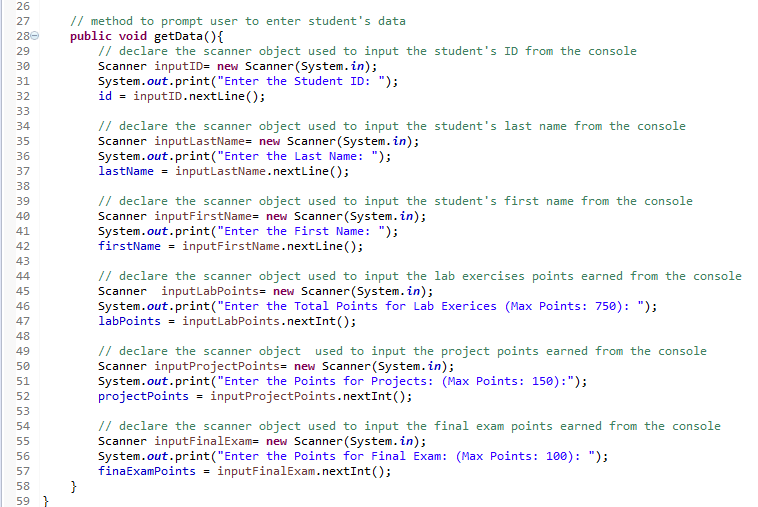
5. Create
the public Void Method called getData() that
will prompt the user to input the data. Below
is the code for the method.
|
//
declare the scanner object used to input the student's ID from the console //
declare the scanner object used to input the student's last name from the
console //
declare the scanner object used to input the student's first name from the
console //
declare the scanner object used to input the lab exercises points earned from
the console //
declare the scanner object used to
input the project points earned from the console //
declare the scanner object used to input the final exam points earned from
the console |
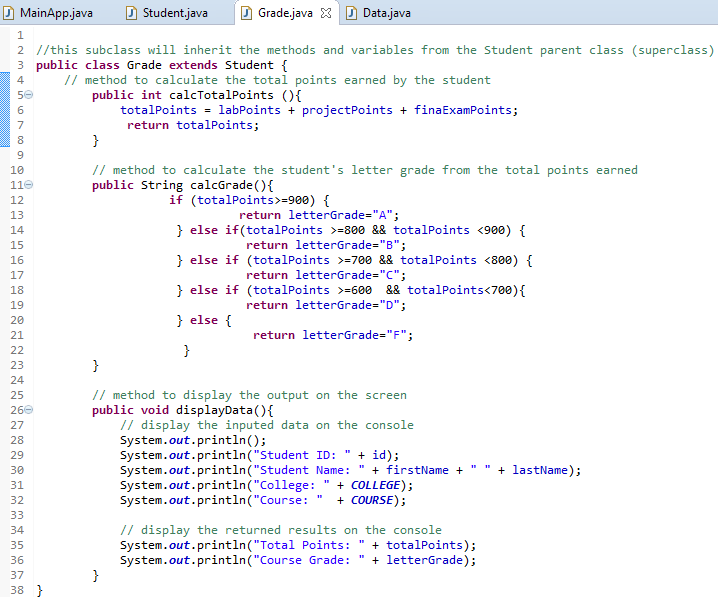
H.
Requirements for the Grade Class:
1. The Grade class will be a subclass of the Student
parent class (superclass)
NOTE: A subclass will inherit the methods and variables from the superclass
Add the keyword "extends Students"
after the name of class
2. Create
the a public Method called calcTotalPoints () with
an integer returned data type that will
calculate the total points earned by the student
|
totalPoints = labPoints + projectPoints + finaExamPoints; |
3. Create
the a public Method called calcGrade() with
a String returned data type that will calculate the
student’s letter grade based on the total points earned
|
if (totalPoints>=900) { |
4. Create
the public Void Method
called displayData() that will display the required
output on the screen. Below is the code
for the method.
|
//
display the inputed data on the console //
display the returned results on the console |
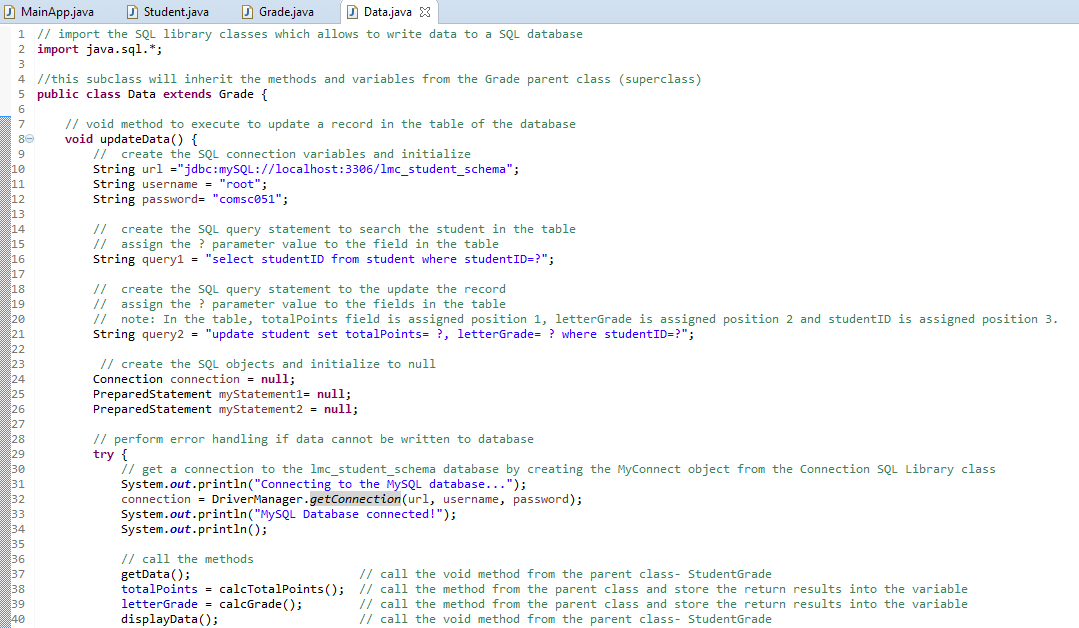
I.
Requirements
for the Data Class:
1. Insert
the following Library Classes to connect and communicate with the SQL Database:
import java.sql.*
2. Create the Void Method called updateData()
3. Declare the SQL connection String variables and initialize.
IMPORTANT: The password value
will depend on the password you entered during the MySQL installation process
At the LMC Computer Lab PCs, the password is
“comsc051”.
|
//
create the SQL connection variables and initialize |
4. Declare the variable to hold the SQL query
statement to
search the student in the table
|
// create the SQL query statement to search
the student in the table |
5. Declare the variable to hold the SQL query
statement to the
update the record
|
// create the SQL query statement to
the update the record |
6. Create the SQL objects from the SQL library
class and initialize to null (empty value)
|
Connection connection
= null; |
7. Insert a Try-Catch block to
perform error handling if data cannot be read from the SQL database
a. Get a
connection to the student SQL database by calling the object's method and
passing the SQL connection values
|
// get a connection to the lmc_student_schema database by creating the MyConnect object from the Connection SQL Library class |
.
b. Call the methods
|
getData(); // call
the void method from the parent class- StudentGrade |
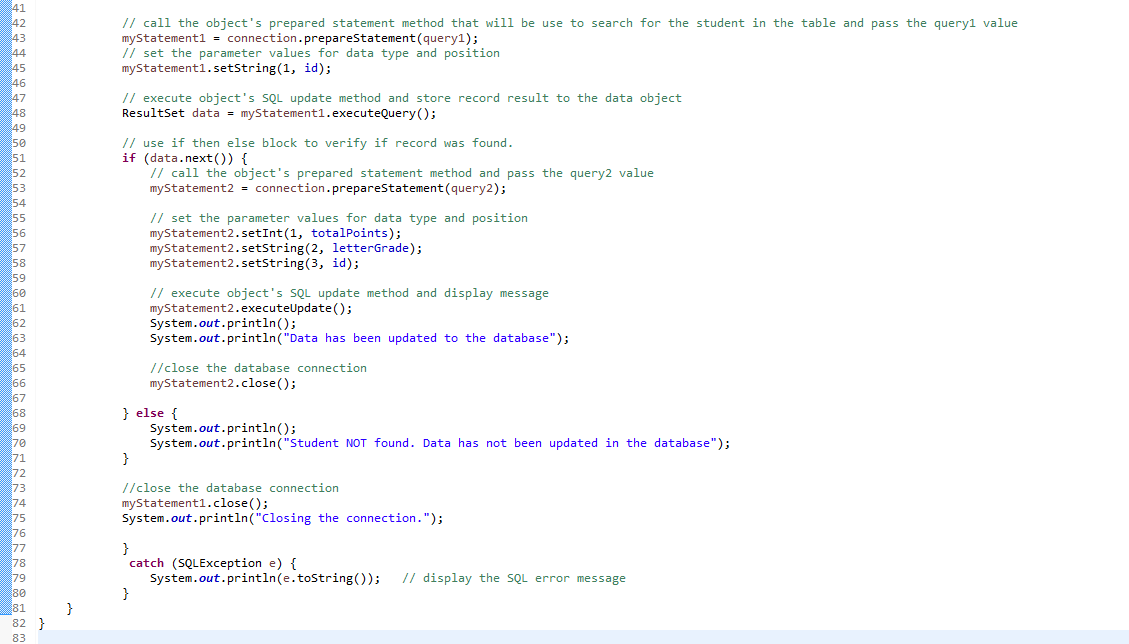
c. Call the object's prepared
statement method and pass the query1 value
|
//
call the object's prepared statement method that will be use
to search for the student in the table and pass the query1 value |
d. Set the parameter values for data type and position
|
// set
the parameter values for data type and position |
e. Execute object's SQL update method
|
//
execute object's SQL update method and store record result to the data object |
f. Use If Then Else block statement to verify if record was found.
f1.
Below is the code in the If block
|
//
call the object's prepared statement method and pass the query2 value //close
the database connection |
f2.
Below is the code in the Else block
|
System.out.println(); |
8. Close
the database connection
|
//close
the database connection |
9. In the
catch block pass the (SQLException e)
value as the parameter
|
System.out.println(e.toString()); |
J. Requirements for the MainApp Class:
1. Add
comments (documentation)– Program Description, Author and Date
2. Create
the instance of the object called studentInfo from the Data
class
3. Call the Object's Void updateData() method

K.
Test:
1. Save your Java code
2. Compile and run your Java program.
3. Verify there is no syntax, logical or run-time
errors.
4. Use the Student ID: B123456 to update the student’s
lab points, project points and final exam points
Enter the
following data:
Student
ID: B123456
Last Name: Doe
First
Name: John
Total Lab Points: 750
Total
Project Points: 150
Final
Exam Points: 100
5. Below is the output results.
Copy and paste a screenshot of the Console output into Paint (save as JPG) or
Word 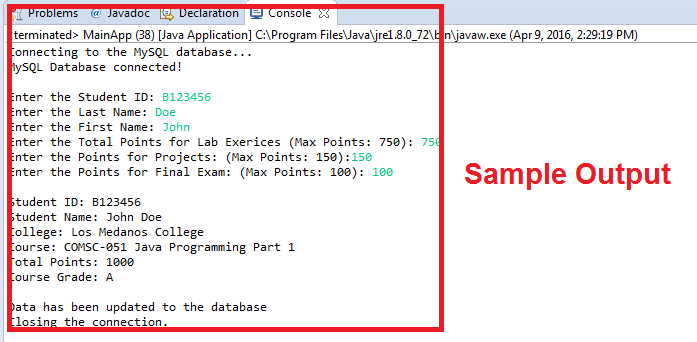
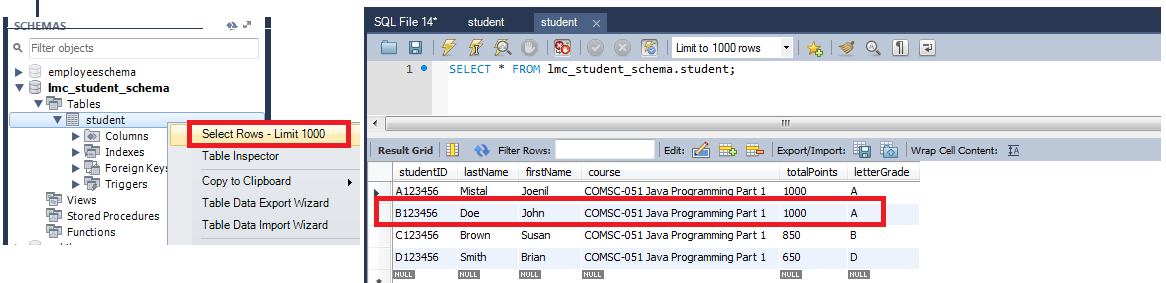
6. Go to
MySQL Workbench and run a query to verify records have been inserted
NOTE: Verify that the John
Doe total points was changed to 1000 and grade to an A
Copy and paste a screenshot of the My SQL Query Tab Results into Paint (save as
JPG) or Word
L.
Submit:
1. Submit the screen shot of the Eclipse
Workbench window showing the Console output screen.
You can use Paint (save as JPG) or Word to paste the screenshot.
2. Submit the screen shot of the MySQL query
screen showing the inserted records in the table (see step K6 above)
3. Zip up and submit the compressed JDBCDemo3 that is in the Project-03 folder.
NOTE: Right click on the subfolder and select
Send to “Compress Folder”. The file will
have a file extension of .zip.
NOTE:
Upload all 3 files above separately to receive full credit